v0ttis wiki
This is my private wiki. It is also the home of my small “blog”.
For information about how to contact me please refer to my website.
Blog
Talk about the virtual CCC conference
Together with Anton Schubert I gave a talk about the rc3 (virtual conference replacing the Chaos Communication Congress in 2020). The talk is about the video technology behind this event.
If you are interested, you can take a look at the slides here or download them as PDF.
A german language video recording of the talk held virtually for the FKTG and as part of the “Media Event” series at TU Ilmenau is also available upon request from Jürgen Burghardt of the FKTG.
Live-Streaming Video Conferences with Zoom and vMix
Using Zoom (or in fact, any other video conferencing solution) together with vMix is not completely trivial. In this post I am going to explain how I do this with a single PC.
Of course one could use the built-in vMix Calls, which already handles a lot of things like N-1 audio routing, but there are quite some limitations.
How-To
Prerequisites
You need the following software installed and running on your vMix machine:
- vMix (4K or higher, some features are not supported in lower versions)
- Zoom (or any other video conferencing solution you prefer)
- NDI Virtual Input (part of the NewTek NDI Tools)
Configure Zoom Client
- Start the Zoom Client and connect to the desired conference
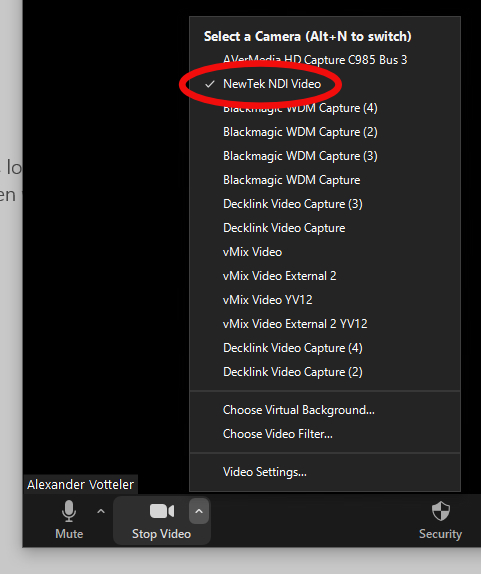
- For the camera, select “NewTek NDI Video”
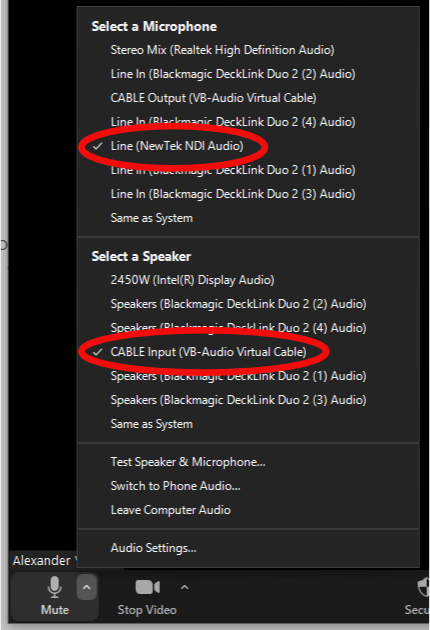
- For the microphone, select “Line (NewTek NDI Audio)”
- For the speaker, select “CABLE Input (VB-Audio Virtual Cable)”
Configure vMix and NDI
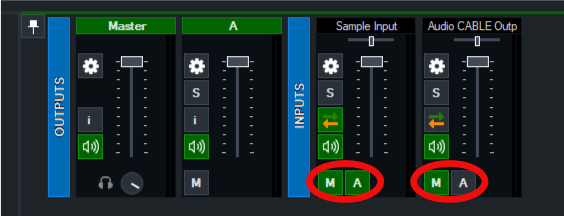
- Configure return audio bus
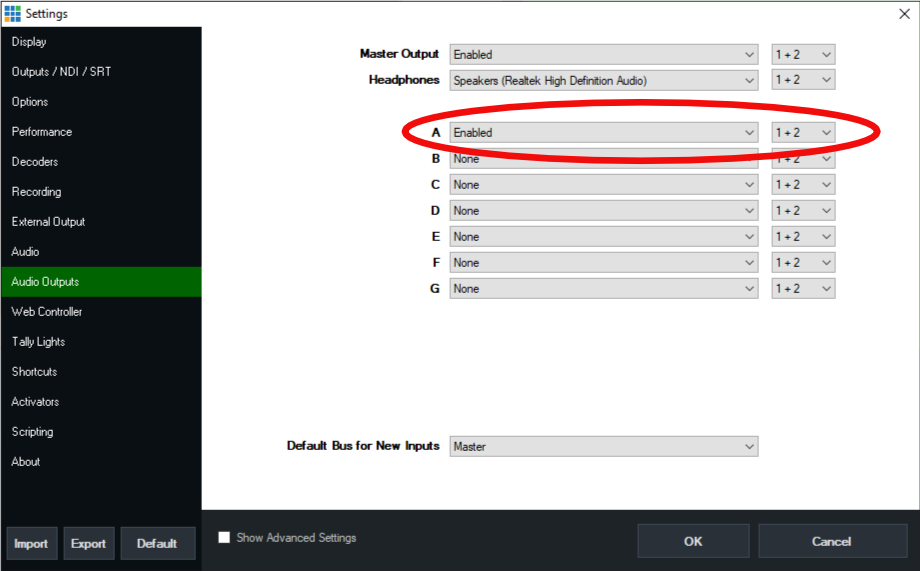
- Add a new audio bus in the vMix settings (you can use “Enabled” as the audio device)
- Add everything that is assigned to the master bus to the new audio bus
- Configure return video feed
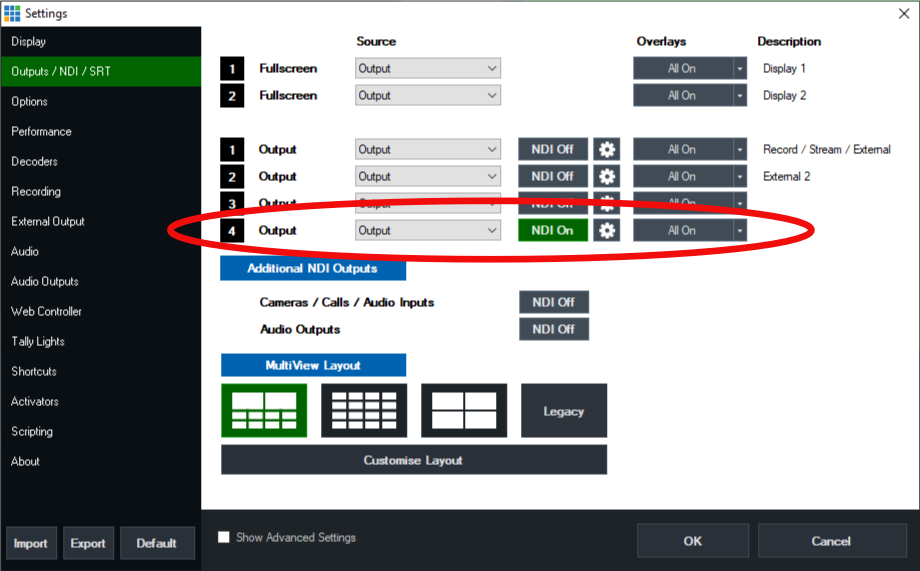
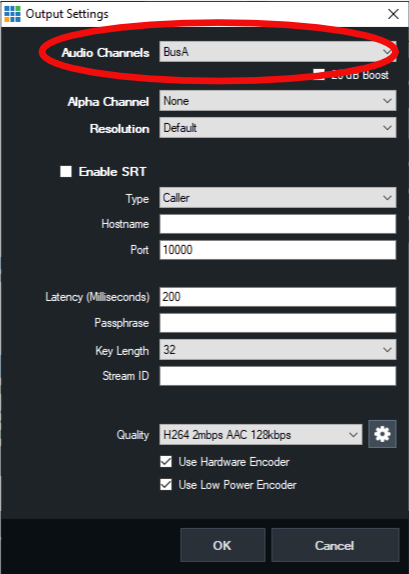
- Activate NDI for an additional output (not Output 1 as we will use a different audio bus) in the vMix settings
- Using the cog icon, assign the newly created audio bus to this output
- Configure the NDI Virtual Input
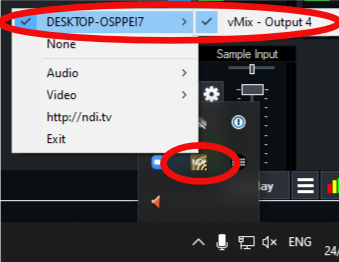
- In the Windows taskbar tray, right click on the NDI Virtual Input icon
- Select the previously configured vMix output
- Configure screen capturing
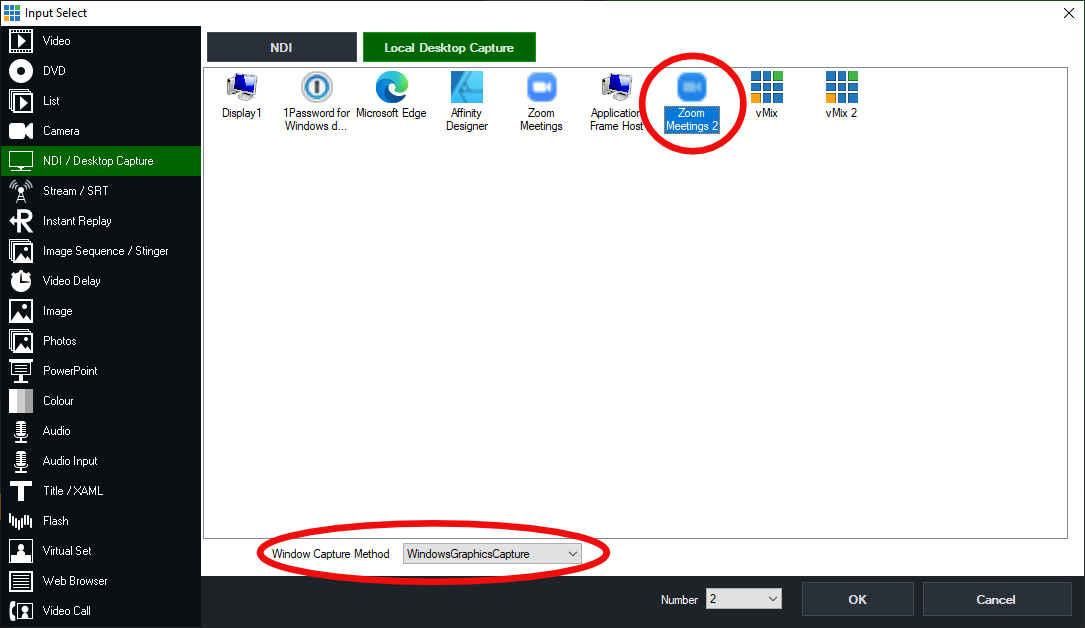
- Add a new “NDI / Desktop Capture” input
- Select “Local Desktop Capture”, then select the Zoom client (“Zoom 2” in my case)
- As Window Capture Method, select “WindowsGraphicsCapture”
- Resize the Zoom window so it best fits your production aspect ratio
- Using the vMix input settings, you can now zoom into the window so it does not show any GUI elements anymore
- Configure the audio input
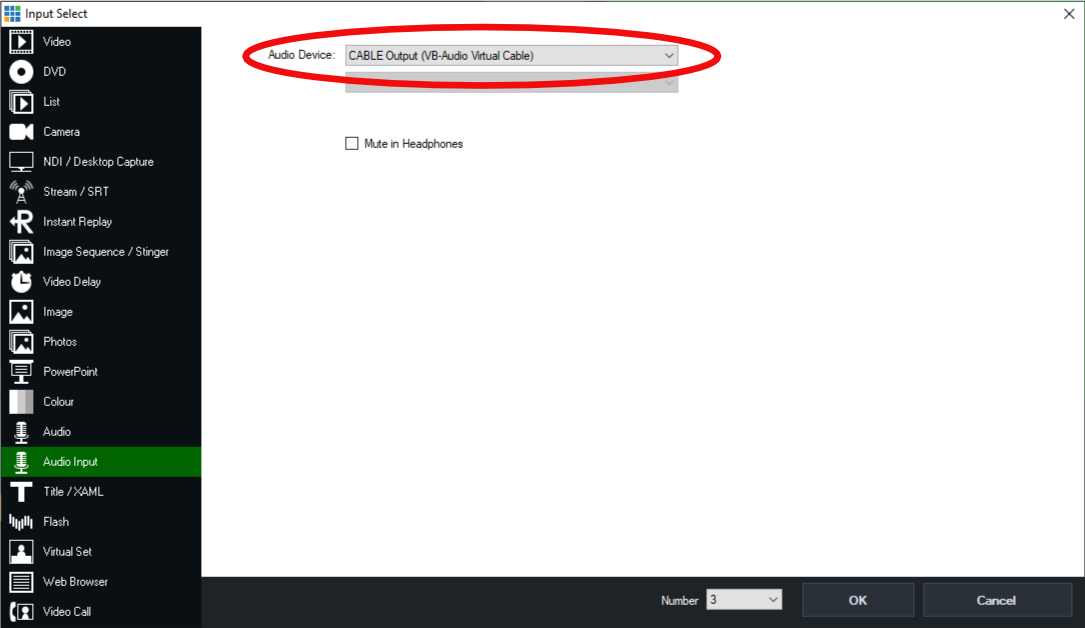
- Add a new “Audio Input” input
- Select “CABLE Output (VB-Audio Virtual Cable)”
- Assign the input to the master audio bus, but not the return feed audio bus
Screenshots
Optional Steps and Remarks
If you want to talk to your guests before you put them on air, remove their audio from the master bus and put them on your headphones using the “S” button. Create a new microphone input with your own microphone and assign it only to the return feed audio bus. Keep in mind to assign the guests back to the master bus and remove your microphone from the return bus before putting them on air.
It is recommended to keep the Zoom client on a dedicated screen.
Using Aruba MPSK with FreeRADIUS
A few months ago Aruba introduced the MPSK authentication feature for their WiFi systems. With MPSK it is possible to have a PSK protected SSID but with a per device/MAC password. Unfortunately it is only officially supported to work with the Clearpass Policy Manager from Aruba. However, we figured out how to use it with the FreeRADIUS RADIUS Server.
Configure the SSID
From the WebUI, create a new SSID with MPSK authentication. It is not possible to select an existing RADIUS server, just create a new dummy server. Now, edit the SSID profile and now change the dummy server to your (previously configured) FreeRADIUS server.
Configure the FreeRADIUS Server
When a client connects the controller will send a RADIUS request to the server. In the response you have to include the vendor-specific attribute Aruba-MPSK-Passphrase. FreeRADIUS already includes this with correct encoding and encryption (check if your version already includes this VSA, otherwise place the linked file at /usr/share/freeRADIUS/dictionary.aruba (this applies to Debian)). Here is an configuration example, please note that “ClearTextPassphrase” is the clear text password for the requesting device: Aruba-MPSK-Passphrase := “ClearTextPassphrase”.
If you operate a proxying RADIUS, like we do, your config could look like this:
post-proxy {
     update proxy-reply {
          Aruba-MPSK-Passphrase := "%{proxy-reply:Tunnel-Password}"
     }
}
Some Notes
Using MPSK without Clearpass is not officially supported and TAC probably won't help if any problem occurs. The controller will cache the password for a period of time (seems to be a couple of hours).
Most of the work explained here was done by Jennifer Graul at FeM, thanks!
If you have any feedback to this article, please let me know!
